PyroMining
PyroMining does not have its own wiki, and this is the closest thing.
Command Summary
- /mine or /mine menu - open PyroMining home menu
- /mine journal - view basic information on the various aspects of PyroMining
- /mine help - view list of available commands
- /mine stats - view all your PyroMining statistics including level
- /mine zeta - view your Zeta balance
- /mine shop - access PyroMining shop to sell fluxes, gemstones, and/or artifacts
- /mine singularity - upgrade skill tree and check rune requirements
- /mine artifacts - open the artifacts menu to identify artifacts or fossils and to upgrade artifact passives
- /mine vessels - open the menu to check current Vessel progress on a pickaxe, and to change requiums
Basic Drops & Economy
While mining ores in both the Overworld and the Nether, there is a chance for additional items to drop which are sellable for money, the standard server currency. From Nether ores, you can obtain Blazed Fluxes; from Overworld ores, you can obtain Basic Flux. Gemstones also occur in both worlds, all with a base drop chance of 2% from their respective ores. Additionally, ores can drop Mysterious Dust and artifacts, which require more detail than the former items. Note that using a silk touch enchanted pickaxe on ores does not yield PyroMining drops.
Both Flux types have no other use with PyroMining, and can be sold directly to /mine shop.
Gemstones can also be sold directly to /mine shop, but you also have the opportunity to increase their value before you sell them, at the risk of instead decreasing their value. This gamble is referred to as “examining the quality” of the gemstone, and is done simply by right-clicking the item while holding it. If you are holding multiple of the same gemstone when you do this, only one will be identified. If your inventory is full, it will drop on the ground. An identified gemstone may then be sold to /mine shop, having no further uses or functionalities.
| Gemstone | Source Ore |
|---|---|
| Peridot | Coal |
| Amethyst | Lapis |
| Ruby | Redstone |
| Sapphire | Emerald |
| Tiger’s Eye | Diamond |
| Topaz | Nether Quartz |
Zeta
PyroMining comes with a crucial custom currency known as Zeta, which is required for some passive upgrades, being able to craft Vessels (custom pickaxe enchantments), and other miscellaneous actions. Zeta is earned as you mine ores (Zeta earned scales with ore value), or in the form of Zeta Tears when dropped from Oracles (one of the miniboss types) or artifacts (an item dropped when mining). Zeta Tears are worth 10,000 Zeta when redeemed, and you can withdraw Zeta from your own balance in the /mine vessels menu.
Check your Zeta balance using /mine zeta. Zeta Tears, as an item, are exchangeable with other players and usable in other server economic means such as the auction house and chest shops.
Player Stats
PyroMining will track for you your productivity in terms of flux acquisition, money you’ve made, gemstones you’ve found, Rune Guardians and Oracles you’ve killed, and the number of artifacts you’ve handled. More importantly, though, /mine stats will inform you of your current Zeta balance and PyroMining level and experience progress. Your PyroMining level is not the same as your Skills mining level, nor, if applicable, is it related to your Jobs mining level. Your PyroMining level affects which Vessels you are permitted to craft and your ability to summon Oracles (minimum level 40). PyroMining does not use a skill tree progression that’s based on your level (see Singularity for its equivalent).
Artifacts
Artifacts are items dropped when mining ores with a 1% base drop chance, and are the primary way to obtain many of the other PyroMining items. When initially obtained, artifacts are sealed; sealed artifacts are stackable, while unsealed ones are not. Sealed artifacts must be unsealed by right-clicking them in your hand before you can do anything else with them (unless you want to sell/purchase sealed artifacts via other server economical means such as the auction house or chest shops. Also note the use of Ancient Relics, explained below). Once an artifact has been unsealed, it can either be sold to /mine shop for server money, or you can “identify” it in /mine artifacts by placing it in one of the iron bar slots and collecting its contents later after its timer has run out. Artifact timers continue when you are offline.
You will notice that artifacts have different tiers. These different tiers correlate with how easily they are obtained, how long they take to identify, and how good the rewards are. Artifacts are the only way (other than from other players) to obtain fossils, which are used to craft Vessels (custom pickaxe enchantments). Tier III and higher artifacts are the only way (other than from other players) to obtain Requium Orbs, which are required when working with Vessels. There is a small chance, especially at lower tiers, for an artifact to award nothing. For the most part, artifacts will award mineral ores, of which redstone and emerald ores are necessary to summon Rune Guardians and Oracles respectively (both are minibosses).
Once you have begun identifying an artifact, hovering over its corresponding minecart will tell you what items it may award, and with what chances. Both of these (items and their chances) are somewhat randomized even among artifacts of the same tier. Every artifact has a chance to drop a fossil; these are also randomized though they generally scale up with the artifact’s tier. PyroMining-specific drops to keep an eye out for include Zeta Tears, Mysterious Dust, Rune Dust, and Ancient Relics (explained below).
Refinery
A refinery is a two-block structure consisting of a dropper and an oak fence post. This structure is required to process your mysterious dust into other usable items, as well as for crafting Vessels (custom pickaxe enchantments) out of identified Fossils.
Build: Place a dropper facing upward, and the oak fence on top of it. It is okay for the fence to attach itself sideways to an adjoining wall.
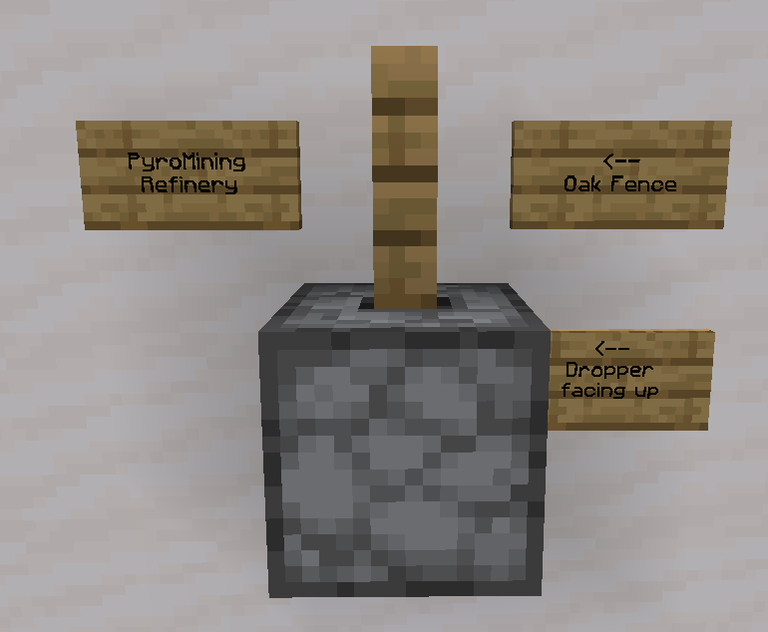
Use: Place mysterious dust, or all 8 identified fossils of a set, into the dropper. Mysterious dust can be placed in stacks. Then right click the fence. The resulting item from mysterious dust will be placed directly in your inventory, or at your feet if your inventory is full. If crafting a Vessel from the fossil set, the vessel item will plop beside the dropper after a long, dramatic pause and some mechanical noises.
Mysterious Dust
Mysterious dust drops from mining ores, and can also be obtained from identified artifacts. When refined, mysterious dust may return nothing, one item, or more than one item. Refer to the refinery to properly use mysterious dust.
At all PyroMining levels, it has a 75% chance of returning Rune Dust.
At level 20 or higher, there is a 2% chance to obtain Oracleite (uncharged, later used to summon the first Oracle miniboss).
At level 25 or higher, there is a 4% chance to receive Ancient Relic.
At level 30 and greater, Shattered Requium Orbs may drop.
Singularity & Runes
The PyroMining “skill tree” is based around a system known as Singularity, which is directly tied with the acquisition of Runes as opposed to your PyroMining level. Access this upgrades menu using /mine singularity. This allows you to check what your current singularity level is overall, and how many points you have available to designate towards passive upgrades. Singularity level has no limitation, but it takes an increasing number of runes to upgrade your singularity each level. The cost to upgrade is all previously required runes plus one additional rune. For instance, if you required 1x Fairy Rune and 1x Ghost Rune when leveling your singularity up to 2, your level 3 upgrade will also require 1x Fairy Rune and 1x Ghost Rune, plus another rune (new or repeated). Each player requires different runes to upgrade their singularity, so trading or bartering with runes may be a good way to help each other.
Rune Guardians
Rune Guardians are side minibosses from which you can obtain elemental Runes. Increasing quantities of runes are required to upgrade your PyroMining passive skills in /mine singularity.
Rune Dust has a 75% chance to drop at all PyroMininng levels from refining mysterious dust, and a variable chance to drop from identifying artifacts in /mine artifacts. Right click a rune dust onto a redstone ore to open the rune guardian spawning menu. You may either spend one rune dust to spawn a random Rune Guardian, or three to spawn a specific one. This latter option is useful when you’re targeting specific runes to upgrade your singularity.
Rune Guardians have different strengths and abilities based on their element; there are seven elements: fire, ghost, lightning, fairy, ground, nature, and water. Killing a rune guardian has a chance to drop the respective elemental rune. This chance can be improved via upgrade in /mine singularity.
| Passive | Effect |
|---|---|
| Requium Progress | Grants more Requium XP (anger) for each thrall killed. |
| Rune Drop Chance | Increases drop chance for runes from rune guardians. |
| Oracle Damage | Reduces damage absorbed from Oracle attacks. |
| Cheaper Upgrades | Makes zeta-based upgrades cheaper in /mine artifacts. |
| More Zeta | Increases zeta yield from all sources. |
Oracles
Oracles are a series of very high-level, increasingly difficult, side minibosses which drop very useful special items that can be used to influence your everyday PyroMining activities. Summoning an oracle requires a PyroMining level of 40+ (check your level in /mine stats). It is highly recommended that you do not attempt to take on Oracles on your own; they are significantly more difficult than Rune Guardians, having more than 4x the health. There is a one-hour cooldown to summon the same Oracle.
Uncharged Oracleite is obtained from refining Mysterious Dust with a 2% chance to drop when Level 20+. Uncharged Oracelite must receive 35 charge before it becomes Charged Oracleite; charge it by mining diamond ore with one Oracleite in your offhand.
Charged Oracleite is used to spawn the first of three Oracles when right-clicked onto an emerald ore. This opens the oracles menu, allowing you to confirm the summoning of Radalite. When an Oracle is killed, it always drops the rune required to summon the next one. When fighting any Oracle, behaviors include teleporting to you and spawning minions (in the form of vexes) to also fight you.
Radalite
Spawn Radalite, the first oracle, by right clicking a Charged Oracleite onto an emerald ore and confirming the spawn in the menu.
Lore: She is fire based and deals bonus damage when she is fought in water. She will set the world on fire with her fiery abilities.
Drops:
- 1-10x Rune Dust (65% chance) - Used to summon Rune Guardians
- 1-2x Zeta Tear (50% chance) - Redeem for 10,000 Zeta each
- 1x Fabled (VI) Artifact (75% chance) - Identify for loot in /mine artifacts
- 1x Mythic (VII) Artifact (60% chance) - Identify for loot in /mine artifacts
- 1-10x Radalite Claw (guaranteed) - Removes cooldown to summon Rune Guardians
- 1x Fossil Transmuter (65% chance) - Converts up to 3 stacked fossils into another fossil of the same body type. Useful in conjunction with Bone Marrow.
- 1x Hell Rune - Required to summon the next Oracle, Impulse
Impulse
Spawn Impulse, the second successive oracle, by right clicking a Hell Rune onto an emerald ore and confirming the spawn in the menu.
Lore: He focuses mainly on electricity, casting lightning and dealing Area-of-Effect (AoE) damage and zoning out attackers before they get close. Careful when killing him as he likes to explode!
Drops: 1-3x Zeta Tears (50% chance) - Redeem for 10,000 Zeta each
1x Celestial (VIII) Artifact (75% chance) - Identify for loot in /mine artifacts
1x Divine (IX) Artifact (60% chance) - Identify for loot in /mine artifacts
1-4x Ancient Relic (75% chance) - Used on an artifact to upgrade its tier
1x Bone Marrow (50% chance) - Duplicates a fossil. Useful when used with Fossil Transmuter
1x Light Rune - Required to summon the next Oracle, Tohka
Tohka
This oracle appears to not be fully implemented yet, though you will receive the Light Rune from Impulse which is used to spawn Tohka.
Lore: She is based around Darkness and is not to be taken lightly. She will swap resistances every 20 seconds and become immune to all damage except from the source she states at the time of the swap. She will also summon minions to help fight. When she loses 500 health she will cast Astral Starfall which will constantly damage players in a huge radius. When she reaches 300 health she will cast Astral Empire which buffs all her stats and will deal large amounts of damage.
Drops:
Drops: 1-7x Zeta Tear (70% chance) - Redeem for 10,000 Zeta each
1x Celestial (VIII) Artifact (90% chance) - Identify for loot in /mine artifacts
1x Divine (IX) Artifact (75% chance) - Identify for loot in /mine artifacts
1x Abyssal Accelerator (60% chance) - Instantly finishes all items in Artifact Identifier /mine artifacts
1x Abyssal Shard (80% chance) - Duplicates a Requium Orb
1-12x Astralite (50% chance) - Used to upgrade and craft Astralite Gear. This is a Blacksmithing feature not yet available in PyroMining, thus the item is not available in-game.
1x Astral Rune - Function unknown, unavailable in-game. Likely pertains to Blacksmithing in the future.
Vessels (Custom Enchantments)
Nomenclature~ The term “vessel” refers to multiple forms, so they will be used here as such:
Vessel item - refers to the item that is crafted, which is then applied to a pickaxe
Vessel progression - refers to the state of the pickaxe after the item has been applied but before the enchantment takes effect. This state is indicated by your pickaxe being temporarily renamed with the vessel name.
Vessel boss - refers to the mob that must be fought, whose defeat applies the enchantment to the pickaxe
Vessel enchantment - refers to the enchantment on the pickaxe after defeating the boss
The wording here does not necessarily reflect the verbage used by the plugin developers, but is written such that it is hopefully more clear to you as a player.
Vessels are a handful of things but ultimately they are custom enchantments for pickaxes that you have to put work into. Once you have crafted a vessel item from a refinery, you can apply that vessel item to a pickaxe by dragging it and clicking it onto your pickaxe. Performing this action initiates a vessel progression specific to that pickaxe. The vessel item is the only state in which vessels are transferable between players. Obtaining a vessel item and applying it to your pickaxe is not the end that gets you a fancy new enchantment on your pickaxe, but rather a beginning of a process to get that enchantment.
Vessel Progression
The vessel progression is the long, bumpy road to getting a vessel enchantment on your pickaxe. When you apply the vessel item to the pickaxe, your pickaxe will be renamed to indicate the vessel enchantment towards which you are now working. You may only have one vessel progression applied to a pickaxe at a time, and the same vessel type does not stack for progression.
During the vessel progression, use your pickaxe normally, but know that each ore you mine could be the death of you, as there is now a chance for the vessel boss to spawn. This spawn chance is extremely low – less than 1%, but you should stay weary as vessel bosses are not meant to be easy. The vessel boss is not the only creature you could encounter during the vessel progression. Thralls are small mobs (silverfish) which also emerge from the ores you mine on occasion. As you kill these little critters, you gain Requium XP, or anger, towards your vessel progression.
The timespan with which you deal with the vessel progression is affected by your preparedness in another area: requiums. Each vessel progression, even for the same vessel type, requires a different requium ordering. Without the correct requium ordering, you are not permitted to kill the vessel boss.
Fossils
Unidentified fossils are obtained from identifying artifacts. To identify a fossil, place it back in /mine artifacts. The time to identify a fossil is one hour. Fossils come from three different creatures: dragon, manticore, and phoenix, and there are 13 uniquely named creatures which translate directly into 13 unique Vessels. An unidentified fossil will indicate the creature type, while an identified fossil will assign a name to it.
There are eight fossil parts belonging to each vessel creature: skull, arm, spine, rib, tail, wing, leg, and foot. Having all eight of those parts for a single creature will allow you to craft a vessel item in a refinery. See refinery page for information on converting your identified fossil collection into a vessel item. Each vessel costs Zeta and requires a minimum PyroMining level to be crafted from fossils.
| Vessel Name | Minimum Level | Zeta Cost |
|---|---|---|
| Nagyns’ Vessel | 5 | 95,000 |
| Necros’ Vessel | 5 | 95,000 |
| Neptulus’ Vessel | 5 | 75,000 |
| Imperos’ Vessel | 5 | 75,000 |
| Seraphs’ Vessel | 8 | 145,000 |
| Auroras’ Vessel | 12 | 120,000 |
| Nefaris’ Vessel | 18 | 140,000 |
| Valakas’ Vessel | 22 | 175,000 |
| Skylarks’ Vessel | 25 | 150,000 |
| Rezoths’ Vessel | 30 | 200,000 |
| Xostrans’ Vessel | 35 | 162,500 |
| Mementos’ Vessel | 40 | 300,000 |
Requium Orbs
Requium orbs, if not recovered from shattered requium orbs, are found in tier III and higher artifacts. You can improve your chances of obtaining requium orbs from artifacts by upgrading the Final Whisper passive in the /mine artifacts menu. There are 12 different orbs which can be collected, and thus required at random: Aleph, Bet, Daleth, Gimel, Heh, Het, Tet, Vav, Yud, Yud Aleph, Yud Bet, and Zayin.
Three random requium orbs are required to kill each vessel boss. To use them, head to the /mine vessels menu with your vessel-progressing pickaxe in your inventory. Once you’ve opened the menu, pick up your pickaxe. This will select it for the menu so that any requiums you move are directly associated with that particular pickaxe. The anvil’s wording says “Click Your Pickaxe.”
With your pickaxe loaded, you should now be able to freely move requium orbs into and out of the three slots below the iron bars. Simply exit the menu to save your chosen requium placements. When you are fighting the vessel boss, these slots are checked for what requiums you have placed in them, consecutively. If it performs the check and the requium orb is correct, the vessel boss’ “shield” partly breaks down and you may continue to fight the vessel boss. If it performs the check but finds an incorrect requium orb in the slot, the vessel boss immediately starts a despawn counter and soon thereafter disappears, leaving you with the knowledge that a particular requium orb does not go in a particular slot.
Getting the correct ordering of requium orbs can be done by guesswork – set random requiums, and the next time the vessel boss spawns, see if they are consecutively correct. You’ll receive a chat message with the requium mentioned in green when it is correct, and the /mine vessels menu will then update to state the requium for that slot since you’ve figured it out. This is not a particularly efficient method, though, as there are 12 possible requiums and 3 slots that you’d have to guess correctly, changing them out for each new spawn of the vessel boss just to guess. It is recommended, though, to set the first one or two requiums immediately after applying the vessel item to your pickaxe, so that you can at least start ticking requiums off the list at the first random spawn of the vessel boss. Failed attempts do not consume your requium orbs; they can be withdrawn after the vessel boss has despawned.
Fortunately, there is a system that works toward directly telling you what each of the requiums should be, and that is through thralls and requium XP (also called “anger”). See below for more details on thralls and their role in the vessel progression.
Note that the requium ordering for one vessel progression differs from the requium ordering for other vessel progressions. For instance, if you’ve applied Valakas Nightfall to your pickaxe, and used the requiums Yud Bet, Aleph, and Vav when you defeated Valakas the first time, the next time you are working towards Valakas Nightfall may instead require Yud Aleph, Bet, and Zayin to defeat Valakas again, or any other combination of requiums.
If you have placed all three requiums correctly, you will be able to proceed with killing the vessel boss. Defeating the vessel boss returns three shattered requium orbs and immediately applies the vessel enchantment to the pickaxe on which the vessel progression was applied (and returns the pickaxe’s name to normal as well). This is the end of the vessel progression and, as the PyroMining informational menus say it, you have defeated the vessel.
Shattered Requium Orbs: Obtainable from refining mysterious dust and after defeating a vessel boss (three are dropped from killing the vessel boss). These represent fragments of a requium orb, and every four shattered pieces can be recombined to form a random requium orb. To convert, hold a stack of four or more shattered requium orbs and right click. Four of them will be consumed and you will be given a requium orb in their place which can then be used as normal.
Thralls
Thralls are small hostile mobs – specifically silverfish – which have a small chance to spawn when you are mining ores using a pickaxe imbued with a vessel progression.
A vessel progression is so-called (here, at least) primarily because of the succession of “anger” that a vessel develops. The anger stat can be viewed after selecting your pickaxe when in the /mine vessels menu, and the levels include Indifferent (default), Annoyed (100%-199% anger), Furious (200-299% anger), and Fuming (300-399% anger). The value in anger, though, is its percentage increase on each requium slot (seen by hovering over the iron bars in /mine vessels). When the anger for a requium slot reaches 100%, the expected requium orb for that slot is revealed. Anger towards requium slots affects one slot at a time and proceeds in order. It can be progressed such that you’re eventually told all three required requiums.
Each thrall you kill increases the anger percentage. The XP yield from thralls can be upgraded with the Requium Progress passive in /mine singularity. Without upgrades, it takes around 14+ thralls to reveal a required requium. You can increase your chance of spawning thralls with Necros Realm on your pickaxe.
Anger resets for each new vessel progression.
Vessel Miniboss
To finish applying a vessel to your pickaxe, you must defeat the vessel boss. The vessel boss has a very small chance to spawn when you mine ores with your pickaxe having the vessel progression. When the boss has spawned, you will temporarily lose access to /mine vessels and the requiums that you have set at the time will be used to attempt to defeat the boss. The vessel boss continues to have a chance to respawn until you have defeated it.
The level of the vessel boss, and its corresponding thralls, will depend on the total number of vessels you have already applied to your pickaxe. Eg. if you have Nagyns Tranquility II and Valaks Nightfall I on your pickaxe, the vessel boss will be level 4.
Vessel bosses have a chance to spawn with a random quirk, granting the vessel boss a small advantage. You can check which quirk, if any, your vessel boss will have by looking at the stats in /mine vessels.
Possible Quirks
- Fire damage immunity
- Projectile immunity
- Slowness immunity
- Life steal
- Armor piercing
- Enhanced speed
Info & Enchants
Vessel enchantments will apply to your pickaxe immediately after you kill the vessel boss (it is assumed your pickaxe will be in your inventory at this time, as it only spawns when mining with the pickaxe). Each vessel can be added on more than once to increase its effects and overall level; if there is already one or more levels of the vessel enchantment on the pickaxe, defeating the vessel boss increases that level by one.
| Vessel | Stats | Effect |
|---|---|---|
| Auroras Blaze | Max Level: 2 Element: Fire |
Auto-smelts iron/gold ores when mined Max Bonus: 25% chance for bonus ingot |
| Imperos Winds | Max Level: 8 Element: Sky |
Higher chance to find rarer Artifacts Max Bonus: 5% increased fossil chance |
| Mementos Stopwatch | Max Level: 20 Element: Time |
Chance for double ore drops (no silk touch) Max Bonus: Chance for 3× drops |
| Nagyns Tranquility | Max Level: 5 Element: Speed |
Chance for Mysterious Dust drops from ores Max Bonus: 20% chance for 2× drop |
| Necros Realm | Max Level: 3 Element: Death |
Bonus XP from Requiums + higher Thrall spawn chance Max Bonus: 50% reduced cooldown |
| Nefaris Shadows | Max Level: 7 Element: Ghost |
Higher Rune drops from Rune Guardians (pickaxe must be in hotbar) Max Bonus: 60% chance |
| Neptulus Wave | Max Level: 10 Element: Water |
Bonus XP for PyroMining level Max Bonus: 10% chance for triple XP |
| Rezoths Destruction | Max Level: 12 Element: Darkness |
Chance for ores to drop different minerals Max Bonus: 10% chance to double that drop |
| Seraphs Grasp | Max Level: 7 Element: Shields |
Bonus Zeta from ores Max Bonus: 15% chance for 3× Zeta |
| Skylarks Dream | Max Level: 5 Element: Nature |
Increased flux sell values Max Bonus: 20% chance for bonus flux |
| Valakas Nightfall | Max Level: 4 Element: Fighting |
Chance to receive Haste II (30–100s) while mining Max Bonus: Receive Haste III |
| Variants Wrath | Max Level: 5 Element: Ghost |
Better odds for fluxes, artifacts, and gems below Y20 Max Bonus: Extension to Y50 |
| Xostrans Glare | Max Level: 5 Element: Slowness |
Increased Oracle drop rates Max Bonus: 20% double drops |
Vessel Removal
All vessel enchantments and vessel progressions can be removed from a pickaxe in the /mine vessels menu at the cost of 100,000 Zeta. Removing the vessels from your pickaxe clears any PyroMining data on the pickaxe and returns to your inventory a vessel item for each vessel enchantment and each level of the vessel enchantments that were on the pickaxe, and a vessel item for an incomplete vessel progression, if applicable.
For instance: if you had Seraphs Grasp III and Mementos Stopwatch I on your pickaxe, with a Xostrans Glare progression going, you would be given 3x Seraphs’ Vessel, 1x Mementos’ Vessel, and 1x Xostrans’ Vessel.